RICS buying features enable retailers to track and analyze inventory transactions as items are ordered or received through the RICS Back Office.
This document is a resource for retailers to understand how to analyze purchase orders using:
• Generate a Purchase Order Report
• Generate an Open POs by Month Report
• Generate an Inventory Detail Report
• Print a Receiving Log
GENERATE A PURCHASE ORDER REPORT
The Purchase Order report enables retailers to analyze purchase order details, original ordered quantities, received quantities and open order quantities for a store. To generate a Purchase Order report:
1. In the RICS Back Office, go to Reporting :: Report Creator
2. Type Purchase Order in the search box or navigate to Inventory/Purchase Orders :: Purchase Order in the menu
FILE OPTIONS
1. Use the File Type dropdown menu to determine the output format
Note: If choosing CSV, use the Advanced Options dropdown to set a Field Delimiter.
2. As needed, enter a report description in the Report Name field
Note: Report descriptions will display in the Report Manager screen.
3. As needed, enter a valid email address in the Email A Copy To field to email the report

REPORT OPTIONS
1. Use the scroll bar to navigate to the Report Options section
2. Use the In Order of dropdown menu to determine the order in which to sort the analyzed purchase orders
In Order of Options:
Supplier – Select to order purchase orders in alphabetical order by supplier.
PO Number – Select to order purchase orders in numerical order by purchase order number.
Ship Date – Select to order purchase orders in numerical order by ship date.

3. Use the Report Detail dropdown menu to determine the detail in which to display the analyzed purchase orders
Report Detail Options:
SKU Detail – Select to display the SKU and size detail for items on a purchase order.
SKU – Select to display the general SKU details for items on a purchase order.
PO – Select to display the general purchase order details on a purchase order.
Store – Select to display the sum total for the store’s purchase orders.

4. Use the Which PO’s Would You Like to Include section to determine what type of purchase orders to analyze
Which PO’s Would You Like to Include Options:
Purchase Orders
At-Once POs – Select to analyze purchase orders to be shipped within 30 days of the current date.
Future POs – Select to analyze purchase orders to be shipped after 30 days from the current date.
Special Order POs – Select to analyze purchase orders marked as Special Orders on the Inventory :: Purchasing :: Enter Purchase Order screen.
Drop Ship POs – Select to analyze purchase orders marked as Drop Ship on the Inventory :: Purchasing :: Enter Purchase Order screen.
Open POs Only – Select to analyze purchase orders currently open.

5. If necessary, use the General Options section to include ASN information for the analyzed purchase orders
Note: Leave both options unclicked if EDI/ASN is not used for a store and/or supplier.

6. Choose a ship, order, cancel and/or last receive date from the Date Range dropdown menus to determine during which dates to analyze purchase orders
Date Range Options:
What is the Date Range for Shipping – Select a date range to analyze based on ship date.
What is the Date Range for Ordering – Select a date range to analyze based on order date.
What is the Date Range for Cancelling – Select a date range to analyze based on cancellation date.
What is the Date Range for Last Received – Select a date range to analyze based on last received date.


REPORT CRITERIA
1. After selecting the report options, use the scroll bar to navigate to the Report Criteria section
Note: To report on all items within a store based on the selections in the Report Options section only, proceed to Step 3.
2. Select and enter the necessary criteria to determine what items to display
Report Criteria Options:
By Store – Enter or search for a store code(s) to determine which store(s) to output.
By Store State – Enter a state’s abbreviation(s) to determine which state(s) to output.
By Supplier – Enter or search for a supplier code(s) to determine which supplier(s) to output.
By Supplier – Enter or search for a supplier code(s) to determine which supplier(s) to analyze.
By Class – From the dropdown menu, select the class or classes to determine which class to analyze.
By Color – Enter a color(s) to determine which color(s) to analyze.
By SKU – Enter or search for an item(s) to determine which item(s) to analyze.
Product Custom Entries – If set up within the store, enter a custom entry or entries to determine which custom entry to analyze.
By PO Supplier – Enter or search for a purchase order supplier(s) to determine which supplier(s) to analyze.
By PO # - Enter or search for a purchase order number to determine which purchase orders to analyze.
Drop Ship Only Options:
PO Customers – Enter or search for a customer(s) to determine which customer(s) to analyze.
By PO Customer City – Enter or search for a customer city to determine which customer(s) to analyze.
By PO Customer State – Enter or search for a customer state to determine which customer(s) to analyze.
By PO Customer Zip – Enter or search for a customer zip code to determine which customer(s) to analyze.
Note: Multiple options can be selected to narrow down a search. If selecting multiple Stores, States, Suppliers, Colors, SKUs, Purchase Orders etc., separate the values by commas. To exclude the selected value(s), select the checkbox next to Exc.

3. Click Run
GENERATE AN OPEN POS BY MONTH REPORT
The Open PO’s by Month report enables retailers to analyze incoming purchase orders for a twelve-month time period based on what is due to be received at a store. To generate an Open PO Quantities by Month report:
1. In the RICS Back Office, go to Reporting :: Report Creator
2. Type Open PO Quantities by Month in the search box or navigate to Inventory/Purchase Orders :: Open PO Quantities by Month in the menu
FILE OPTIONS
1. Use the File Type dropdown menu to determine the output format
Note: If choosing CSV, use the Advanced Options dropdown to set a Field Delimiter.
2. As needed, enter a report description in the Report Name field
Note: Report descriptions will display in the Report Manager screen.
3. As needed, enter a valid email address in the Email A Copy To field to email the report

REPORT OPTIONS
1. Use the scroll bar to navigate to the Report Options section
2. Use the Group By dropdown menu to determine the order and detail in which to display the analyzed purchase orders
Group By Options:
Suppliers – Select to group open purchase orders alphabetically by supplier.
Class – Select to group open purchase orders by class.
Note: If necessary, Select the Print SKU Detail in Each Group checkbox to display the open purchase order total for all SKUs by supplier or class.

3. Use the Which PO’s Would You Like to Include section to determine what type of purchase orders to analyze
Which PO’s Would You Like to Include Options:
Purchase Orders
At-Once POs – Select to analyze purchase orders to be shipped within 30 days of the current date.
Future POs – Select to analyze purchase orders to be shipped after 30 days from the current date.
Special Order POs – Select to analyze purchase orders marked as Special Orders on the Inventory :: Purchasing :: Enter Purchase Order screen.
Drop Ship POs – Select to analyze purchase orders marked as Drop Ship on the Inventory :: Purchasing :: Enter Purchase Order screen.
Open POs Only – Select to analyze purchase orders currently open.

4. Enter the date in which to start a twelve-month period in the What Date Do You Want to Report On field

5. Use the Value dropdown menu to determine which value to display
Value Options:
Open Qty – Select to display the open value based on quantity.
Open Cost – Select to display the open value based on cost.
Open Retail – Select to display the open value based on retail price.

6. Use the Date dropdown menu to determine which purchase order date to analyze
Date Options:
Ship Date – Select to analyze open purchase orders based on ship date.
Cancel Date – Select to analyze open purchase orders based on cancellation date.
Payment Date – Select to analyze open purchase orders based on payment date.

REPORT CRITERIA
1. After selecting the report options, use the scroll bar to navigate to the Report Criteria section
Note: To report on all open purchase orders within a store based on the selections in the Report Options section, proceed to Step 3.
2. Select and enter the necessary criteria to determine what items to display
Purchase Order Options:
By Store – Enter or search for a store code(s) to determine which store(s) to output.
By Store State – Enter a state’s abbreviation(s) to determine which state(s) to output.
By Supplier – Enter or search for a supplier code(s) to determine which supplier(s) to analyze.
By Class – From the dropdown menu, select the class or classes to determine which class to analyze.
By Color – Enter a color(s) to determine which color(s) to analyze.
By SKU – Enter or search for an item(s) to determine which item(s) to analyze.
Product Custom Entries – If set up within the store, enter a custom entry or entries to determine which custom entry to analyze.
Note: Multiple options can be selected to narrow down a search. If selecting multiple Stores, States, Suppliers, Colors, SKUs, Purchase Orders or Product Custom Entries separate the values by commas. To exclude the selected value(s), select the checkbox next to Exc.

3. Click Run
GENERATE AN INVENTORY DETAIL REPORT
The Inventory Detail report enables retailers to analyze inventory changes due to receiving, sales, purchase orders and physical inventory transactions as determined by the selected criteria and inventory change types. To generate an Inventory Detail report:
1. In the RICS Back Office, go to Reporting :: Report Creator
2. Type Inventory Detail in the search box or navigate to Inventory/Purchase Orders :: Inventory Detail in the menu
FILE OPTIONS
1. Use the File Type dropdown menu to determine the output format
Note: If choosing CSV, use the Advanced Options dropdown to set a Field Delimiter.
2. As needed, enter a report description in the Report Name field
Note: Report descriptions will display in the Report Manager screen.
3. As needed, enter a valid email address in the Email A Copy To field to email the report

REPORT OPTIONS
1. Use the scroll bar to navigate to the Report Options section
2. Use the Sales Period dropdown menu to determine what sales period to analyze

3. If necessary, select the Include Costs and Pricing option to determine if the cost of an item at the time the transaction will display

4. Use the Report Type and Sort By dropdown menus to determine in what level and order to display the analyzed items
Report Type Options:
Size Detail – Select to display item information by date, inventory change type and size.
SKU Detail – Select to display item information by date and inventory change type.
SKU Summary – Select to display item information by inventory change type.
Class / Supplier / PO Summary – Select to display the class, supplier, or purchase order information by inventory change type.
Store Summary – Select to display the store information by inventory change type.
Sort By Options:
SKU – Select to order items based on SKU as set in Setup :: Manage SKUs
Class / SKU – Select to order items based on class and SKU as set in Setup :: Manage SKUs
Supplier / SKU – Select to order items based on supplier and SKU as set in Setup :: Manage SKUs
PO – Select to order items based on purchase order and SKU as set in Setup :: Manage SKUs

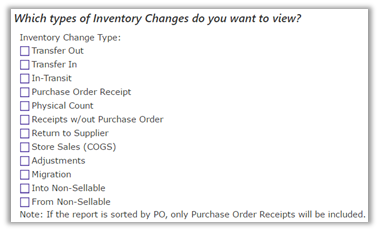
5. Select the Inventory Change Type options to determine which inventory transactions to analyze
Inventory Change Type Options:
Transfer Out – Select to view items transferred out of the store’s inventory within the selected sales period.
Transfer In – Select to view items transferred into the store’s inventory within the selected sales period.
In-Transit – Select to view items transferred to the store but have not yet been received within the selected sales period.
Purchase Order Receipt – Select to view items received into the store’s inventory on a purchase order within the selected sales period.
Physical Count – Select to view items entered into the store’s inventory via Inventory :: Physical Inventory :: Enter Physical Counts within the selected sales period.
Receipts w/out Purchase Order – Select to view items received into the store’s inventory without a purchase order within the selected sales period.
Return to Supplier – Select to view items removed from the store’s inventory to be returned to the supplier within the selected sales period.
Store Sales (COGS) – Select to view items sold from the store within the selected sales period.
Adjustments – Select to view items reconciled, reduced, or increased based on transfers, or merged within the selected sales period.
Into Non-Sellable – Select to view items moved into the store’s non-sellable inventory within the selected sales period.
From Non-Sellable - Select to view items moved out of the store’s non-sellable inventory within the selected sales period.
Note: Multiple options can be selected to expand or narrow down a user’s report.
REPORT CRITERIA
1. After selecting the report options, use the scroll bar to navigate to the Report Criteria section
Note: To report on all items within a store based on the selections in the Report Options section only, proceed to Step 3.
2. Select and enter the necessary criteria to determine what items to display on the report
Report Criteria Options:
By Store – Enter or search for a store code(s) to determine which store(s) to output.
By Store State – Enter a state’s abbreviation(s) to determine which state(s) to output.
By Supplier – Enter or search for a supplier code(s) to determine which supplier(s) to output.
By Class – From the dropdown menu, select the class or classes to determine which class to output.
By Color – Enter a color(s) to determine which color(s) to output.
By SKU – Enter or search for an item(s) to determine which item(s) to output.
By PO# - Enter or search for a purchase order number(s) to determine which purchase order(s) to output.
Product Custom Entries – If set up within the store, enter a custom entry or entries to determine which custom entry to output.
Note: Multiple options can be selected to narrow down a search. If selecting multiple Stores, States, Suppliers, Colors, SKUs, Purchase Orders or Product Custom Entries separate the values by commas. To exclude the selected value(s), select the checkbox next to Exc.

3. Click Run
PRINT A RECEIVING LOG
The Print Receiving Logs feature enables retailers to re-print past receiving logs for purchase orders, transfer orders, and receipts without purchase orders. To print a Receiving Log:
1. In the RICS Back Office, go to Reporting :: Print Receiving Logs
2. Enter the necessary criteria to determine what receiving logs to re-print. Multiple options can be selected to narrow down a search.
Receiving Log Options:
Purchase Order #: Enter or search for a purchase order number to view any receiving logs associated with that purchase order.
Username: Enter or search for a username to view any receiving logs associated with that user.
Log Type: Enter a log type to view any receiving logs with the selected log type.
Start Date: Enter a start date to view any receiving logs generated on or after this date.
Receiving Log Names: Enter a receiving log name to view any receiving logs with that name.
Transfer Order #: Enter or search for a transfer order number to view any receiving logs associated with that transfer order.
Supplier Code: Enter or search for a supplier code to view any receiving logs associated with that supplier.
PO Supplier Codes: Enter or search for a purchase order supplier code to view any receiving logs associated with purchase orders by that supplier.
End Date: Enter an end date to view any receiving logs generated on or before this date.
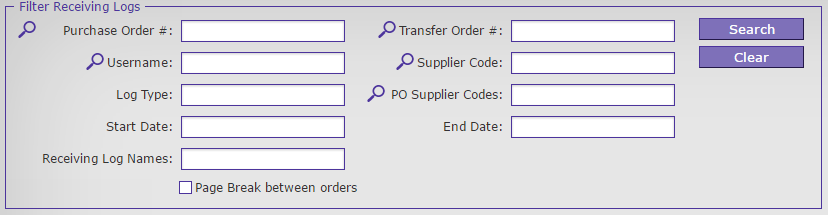
Note: Select the Page Break Between Orders checkbox to add a page break between each order.
3. Click Search to display the receiving logs below the criteria options based on selected criteria in Step 2
4. Select the receiving log(s) to be re-printed
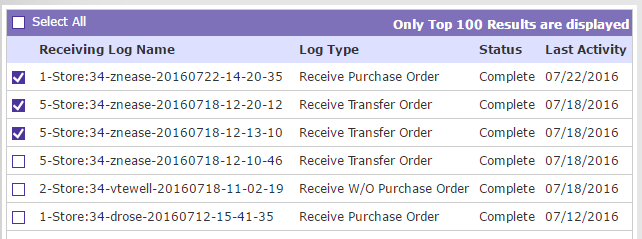
Note: Click Select All to re-print all displayed receiving logs.
5. Click Print Selected Logs
Comments