The RICS Point of Sale feature enables retailers to track and analyze transactions processed through the RICS POS in order to view daily sales by transaction and/or tender to verify bank deposits for a selected period of time. To assist retailers with tracking and analyzing these transactions, RICS has several reports.
This document is a resource for retailers to understand how to analyze store sales using:
• Generate a Sales Journal Report
• Generate a Store Analysis Report
• Generate a POS Summary Report
GENERATE A SALES JOURNAL REPORT
The RICS Sales Journal report enables retailers to view daily sales transaction details for a selected time period. To generate a Sales Journal report:
1. In the RICS Back Office, go to Reporting :: Report Creator
2. Type Sales Journal in the search box or navigate to POS :: Sales Journal in the menu
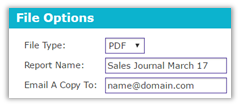
FILE OPTIONS
1. Use the File Type dropdown menu to determine the output format
Note: If choosing CSV, use the Advanced Options dropdown to set a Field Delimiter.
2. As needed, enter a report description in the Report Name field
Note: Report descriptions will display in the Report Manager screen.
3. As needed, enter a valid email address in the Email A Copy To field to email the report
REPORT OPTIONS
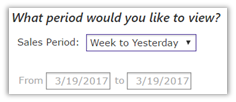
1. Us the scroll bar to navigate to the Report Options section
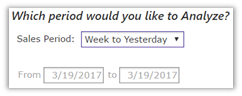
2. Use the Sales Period dropdown menu to determine what sales period to analyze
3. Select the Page Break After Batch checkbox to separate each batch for a store by a page break

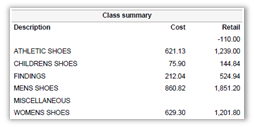
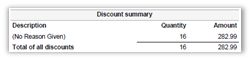
4. Select the necessary Additional Sales Journal Options to determine what additional information to display on the report
Additional Sales Journal Options:
Include Class Summary – Select to display a summary of class sales for each batch.
Include Discount Summary – Select to display a summary of discounts for each batch.
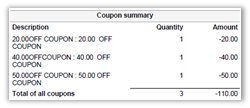
Include Coupon Summary – Select to display a summary of coupons for each batch.
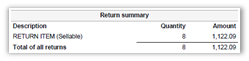
Include Return Code Summary – Select to display a summary of return codes and dollars for each batch.
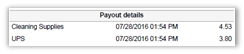
Include Payout Details – Select to display a summary of payouts for each batch.
Include Sales Tax Summary – Select to display a summary of taxes and taxable sales for each batch.

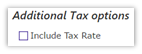
5. Select the Include Tax Rate checkbox to include a tax rate for each tax instance
6. Select the Report Tickets/Payouts on Batch Date checkbox to display sales based on the batch date

Example: A batch is opened on 7/22/2016 and closed on 7/24/2016. A Sales Period of 7/22/2016 was selected in Step 2. To report on sales for 7/23-24 of the batch, select the checkbox.
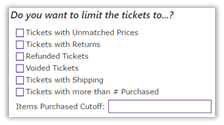
7. If necessary, use the Do You Want to Limit the Tickets To section to determine what sales to display on the report
Ticket Options:
Tickets with Unmatched Prices – Select to display transactions in which the sale price for an item differs from the active selling price.
Tickets with Returns – Select to display transactions of a return transaction type.
Refunded Tickets – Select to display transactions in which a refund is paid to a customer.
Voided Tickets – Select to display transactions in which a void was processed through the RICS POS or the RICS Back Office.
Tickets with Shipping – Select to display transactions in which a shipping fee was entered through the RICS POS Ticket Payment screen.
Tickets with more than # Purchased – Select to display transactions in which a specific number of items have been purchased. The number of items will be specified in the Items Purchased Cutoff field.
8. Select the appropriate What Sale Types Would You Like to Include options to determine what sale types to display on the report

Note: All transactions processed through the RICS POS will be a Store Sale type unless specified at the RICS POS Ticket Header screen under the Sale Type option.
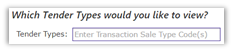
9. If necessary, enter a Tender Type(s) to determine what tenders to display on the report as set up in Setup :: Manage Store :: Tenders Setup
10. If necessary, enter a Transaction Type(s) to determine what transactions to display

REPORT CRITERIA
1. After selecting the report options, use the scroll bar to navigate to the Report Criteria section
2. Select and enter the necessary criteria to determine what sales to display
Report Criteria Options:
By Store – Enter or search for a store code(s) to determine which store(s) to output.
By Store State – Enter a state’s abbreviation(s) to determine which state(s) to output.
Note: Multiple options can be selected to narrow down a search. If selecting multiple Stores or States, separate each value by a comma. To exclude the selected value(s), select the checkbox next to Exc.

3. Click Run
GENERATE A STORE ANALYSIS REPORT
The RICS Store Analysis report enables retailers to view totals by tender and transaction type for a selected time period. To generate a Store Analysis report:
1. In the RICS Back Office, go to Reporting :: Report Creator
2. Type Store Analysis in the search box or navigate to POS :: Store Analysis in the menu
FILE OPTIONS
1. Use the File Type dropdown menu to determine the output format
Note: If choosing CSV, use the Advanced Options dropdown to set a Field Delimiter.
2. As needed, enter a report description in the Report Name field
Note: Report descriptions will display in the Report Manager screen.
3. As needed, enter a valid email address in the Email A Copy To field to email the report

REPORT OPTIONS
1. Use the scroll bar to navigate to the Report Options section
2. Use the Sales Period dropdown menu to determine what sales period to analyze

3. Click Run
REPORT CRITERIA
1. After selecting the report criteria, use the scroll bar to navigate to the Report Criteria section
2. Select and enter the necessary criteria to determine what sales to display
Report Criteria Options:
By Store – Enter or search for a store code(s) to determine which store(s) to output.
By Store State – Enter a state’s abbreviation(s) to determine which state(s) to output.
Note: Multiple options can be selected to narrow down a search. If selecting multiple Stores or States, separate each value by a comma. To exclude the selected value(s), select the checkbox next to Exc.

3. Click Run
GENERATE A POS SUMMARY REPORT
The RICS POS Summary report enables retailers to view a summary of sales, transactions, tenders and POS balance information by station for a selected time period. To generate a POS Summary report:
1. In the RICS Back Office, go to Reporting :: Report Creator
2. Type POS Summary in the search box or navigate to POS :: POS Summary in the menu
FILE OPTIONS
1. Use the File Type dropdown menu to determine the output format
Note: If choosing CSV, use the Advanced Options dropdown to set a Field Delimiter.
2. As needed, enter a report description in the Report Name field
Note: Report descriptions will display in the Report Manager screen.
3. As needed, enter a valid email address in the Email A Copy To field to email the report

REPORT OPTIONS
1. Use the scroll bar to navigate to the Report Options section
2. Use the Sales Period dropdown menu to determine what sales period to analyze
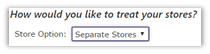
3. Use the Store Options dropdown menu to determine how analyzed store data will be grouped
Store Options:
Separate Stores – Select to display store totals by individual store.
Combine Stores – Select to display combined store totals for all stores.
REPORT CRITERIA
1. After selecting the report criteria, use the scroll bar to navigate to the Report Criteria section
2. Select and enter the necessary criteria to determine what sales to display
Report Criteria Options:
By Store – Enter or search for a store code(s) to determine which store(s) to output.
By Store State – Enter a state’s abbreviation(s) to determine which state(s) to output.
Note: Multiple options can be selected to narrow down a search. If selecting multiple Stores or States, separate each value by a comma. To exclude the selected value(s), select the checkbox next to Exc.

3. Click Run
Comments