The Receive Purchase Order feature enables retailers to receive product shipped by a supplier via a purchase order to manage and audit ordered versus shipped quantities.
This document is a resource for retailers to understand how to receive purchase orders using:
• Receive a Purchase Order – In Full
• Receive a Purchase Order – SKU Detail
• Receive a Purchase Order – Scanning
• Receive a Purchase Order – Upload
RECEIVE A PURCHASE ORDER – IN FULL
Follow the steps below to receive a purchase order in full.
1. In the RICS Back Office, go to Inventory :: Receiving :: Receive Purchase Orders from the Store level
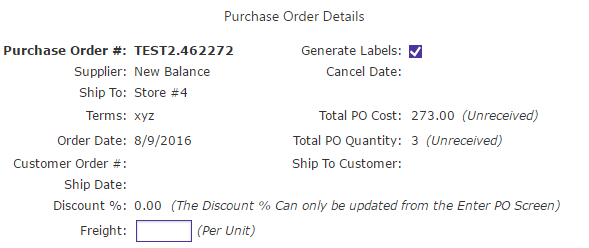
2. To select a purchase order, enter or search for a purchase order number in the Purchase Order # field
Note: After the purchase order is selected, the purchase order details will display.

3. If necessary, enter freight at a per-unit cost as charged by a supplier
Example: If a supplier charges $50 in freight for 50 items, the user will enter $1.00.
4. If necessary, unselect the Generate Labels checkbox to prevent RICS from generating a label for all items received on the purchase order
5. Click Receive Full PO
Note: Receiving a purchase order in full should only occur if all items on the shipment have arrived and the user has verified the order quantity and cost matches the shipped quantity and invoice.
6. When prompted, click Yes to receive all items on a purchase order

7. Click Print Log to generate a receiving log on the Report History screen
RECEIVE A PURCHASE ORDER – SKU DETAIL
Follow the steps below to receive a purchase order via the SKU Detail tab.
1. In the RICS Back Office, go to Inventory :: Receiving :: Receive Purchase Orders from the Store level
2. To select a purchase order, enter or search for a purchase order number in the Purchase Order # field
Note: After the purchase order is selected, the purchase order details will display.
3. If necessary, enter freight at a per-unit cost as charged by a supplier
Example: If a supplier charges $50 in freight for 50 items, the user will enter $1.00.
4. If necessary, unselect the Generate Labels checkbox to prevent RICS from generating a label for all items received on the purchase order
5. Click the SKU Detail tab
6. Click the SKU to be received from the SKU List window
Note: After the SKU is selected, the SKU details and SKU grid will populate
SKU Details:

SKU Grid:

7. If necessary, modify the received quantities to reflect the quantities shipped
Note: To adjust a previous purchase order that was incorrectly received, enter a negative quantity to reverse a receipt.
8. Click Save SKU
Note: If received quantities were modified in Step 7, a user will be prompted to address the remaining quantities by selecting one of the following options:
Cancel Remaining: All remaining ordered quantities will be removed from the purchase order.
Back Order: All remaining ordered quantities will be backordered and left on the purchase order.

9. Repeat Steps 6-8 for all remaining items in a shipment
10. Click Print Log to generate a receiving log in the Report History screen
RECEIVE A PURCHASE ORDER – SCANNING
Follow the steps below to receive a purchase order via the Scanning tab.
1. In the RICS Back Office, go to Inventory :: Receiving :: Receive Purchase Orders from the Store level
2. To select a purchase order, enter or search for a purchase order number in the Purchase Order # field
Note: After the purchase order is selected, the purchase order details will display.

3. If necessary, enter freight at a per-unit cost as charged by a supplier
Example: If a supplier charges $50 in freight for 50 items, the user will enter $1.00.
4. If necessary, unselect the Generate Labels checkbox to prevent RICS from generating a label for all items received on the purchase order
5. Click the Scanning tab
6. Scan all UPCs for the items to be received in a shipment
7. After scanning the last UPC, click Add to account for the last UPC scanned

8. Click Receive Scanned Items
Note: All remaining ordered quantities will be backordered and remain on the purchase order to be received in the future.
9. Click Print Log to generate a receiving log on the Report History screen
RECEIVE A PURCHASE ORDER – UPLOAD
Follow the steps below to receive a purchase order via the Upload tab and Datalogic Memor portable reader.
1. In the RICS Back Office, go to Inventory :: Receiving :: Receive Purchase Orders from the Store level
2. To select a purchase order, enter or search for a purchase order number in the Purchase Order # field
Note: After the purchase order is selected, the purchase order details will display.

3. If necessary, enter freight at a per-unit cost as charged by a supplier
Example: If a supplier charges $50 in freight for 50 items, the user will enter $1.00.
4. If necessary, unselect the Generate Labels checkbox to prevent RICS from generating a label for all items received on the purchase order
5. Click the Upload tab
6. Connect the Datalogic Memor portable reader to the computer
7. Click the Upload From Reader option
8. Use the Reader Type dropdown menu to select DataLogic Memor
9. Click Get Data From Reader

10. In the File Dialog box, name the uploaded file and click Save to store the file on the computer
Note: After the file is uploaded the user will receive a message verifying the file has been uploaded successfully.

11. Click the Scanning tab
12. Click Receive Scanned Items
Note: All remaining ordered quantities will be backordered and remain on the purchase order to be received in the future.
13. Click Print Log to generate a receiving log on the Report History screen
Comments