The Manage Return Codes feature enables retailers to create a return code to attach to a returned item at the RICS POS, on the RICS Manage Non-Sellable Batch screen, or on the RICS Add to Non-Sellable screen. Applying a return code allows retailers to analyze the frequency of returns types through RICS Non-Sellable Inventory report.
This document is a resource for retailers to understand how to:
• Create a Return Code
• Edit a Return Code
• Delete a Return Code
CREATE A RETURN CODE
Follow the steps below to create a return code.
1. In the RICS Back Office, go to Setup :: Codes :: Manage Return Codes
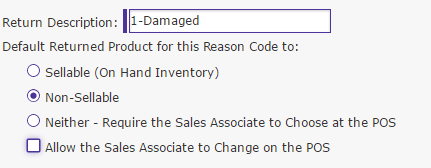
2. Enter up to a thirty-two character alphanumeric return code in the Return Description field
3. Select the default action when the return code is used
Options:
Sellable – The returned item will be added back to on hand inventory.
Non-Sellable – The returned item will be added to non-sellable inventory.
Neither – At the time of a return, the cashier selects whether the item is Sellable or Non-Sellable at the RICS POS.
4. If necessary, click the Allow the Sales Associate to Change on the POS checkbox
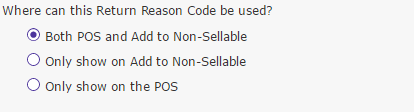
5. Select where the reason code can be used from the Where can this Return Reason Code be used section
Options:
Both POS and Add to Non-Sellable – The return code can be used at the RICS POS, the RICS Manage Non-Sellable Batch screen and the RICS Add to Non-Sellable screen.
Only show on Add to Non-Sellable – The return code can only be used at the RICS Manage Non-Sellable Batch screen and the RICS Add to Non-Sellable screen.
Only show on the POS – The return code can only be used at the RICS POS.
6. If necessary, enter an expiration date in the No Longer Available After field
7. Click Save
EDIT A RETURN CODE
Follow the steps below to edit a return code.
1. In the RICS Back Office, go to Setup :: Codes :: Manage Return Codes
2. To edit an existing return code, locate and select the return code in the Return Codes list
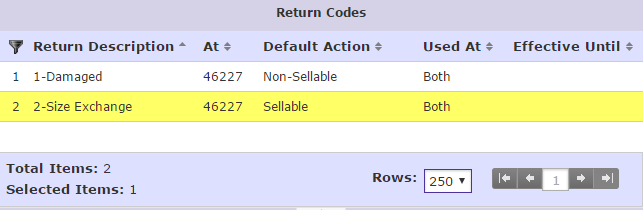
Note: After the return code is selected, the code will be highlighted.
3. As needed, edit the return code’s Default Returned Product for this Reason Code to option and/or the Where can this Return Reason Code be used option
4. Click Save
DELETE A RETURN CODE
Follow the steps below to delete a return code.
1. In the RICS Back Office, go to Setup :: Codes :: Manage Return Codes
2. To delete an existing return code, locate and select the return code in the Return Codes list

Note: After the return code is selected, the code will be highlighted.
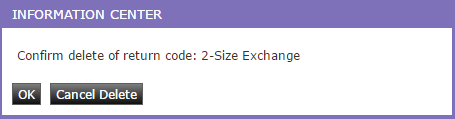
3. Click Delete
Note: A return code attached to a non-sellable item or an incomplete non-sellable batch cannot be deleted.
4. Click OK when prompted to delete the return code
Comments