The RICS POS enables retailers to process sales transactions, as well as check the balance of a gift card, on hand inventory, enter time clock records, etc.
This document is a resource for retailers to understand how to use:
• Verify an Item(s) Price
• Verify Gift Card Balance
• View On Hand Inventory
• Enter a Payout
• Clock In/Out on the RICS POS
• Convert Currency
• Set RICS POS Terminal Settings
• Access RICS Back Office

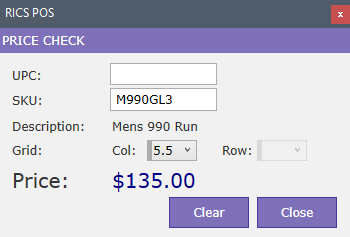
VERIFY AN ITEM(S) PRICE
Follow the steps below to verify the price of an item on the RICS POS.
1. In the RICS POS, click the Price Check tab
2. Scan an item’s UPC or enter a SKU with the corresponding Col and/or Row
VERIFY GIFT CARD BALANCE
Follow the steps below to verify the balance of a gift card on the RICS POS.
1. In the RICS POS, click the Gift Card tab
2. Scan a gift card barcode or enter the gift card number into the Gift Card Number field
3. Click Go

Note: If a gift card reads as “invalid” the gift card does not exist within the RICS Back Office or POS.
VIEW ON HAND INVENTORY
The RICS Inventory Inquiry feature enables retailers to view on hand inventory while analyzing past sales transactions, receiving transactions, and incoming inventory for an item.
GENERAL TAB
1. In the RICS Back Office, go to Inventory :: Inventory Inquiry at the store level
2. To select an item, enter or search for a SKU in the SKU field
Note: After the item is selected, the SKU Details will display providing general information about the item.

Note: General information displayed is determined by a user’s permission settings and roles.
3. Use the Primary and Secondary dropdown menus to determine what inventory value to display

Note: Depending on the Primary view selected, the Secondary view option may not be available.
4. If necessary, enter a store or state in the corresponding fields
Note: This option should only be used in a multi-store environment.
OPTIONAL DETAILS TAB
1. With the item selected on the General Tab, click the Optional Details tab
2. Select the Show Sales Summary, Show Detailed Report, Show Info Report and/or Show Purchase Order Detail checkbox to determine what information to display

Options:
Show Sales Summary – Select to display a summary of weekly, monthly, yearly, and seasonal sales including quantity sold, net sales, and profit for an item.

Show Detailed Report – Select to display all transactions processed through the RICS Back Office and the RICS POS for an item including date, column and row, type of transaction, cost, etc.

Show Purchase Order Detail – Select to display purchase order details for open or recently closed POs for an item

Show Info Report – Select to display monthly sales quantity and dollars, GP%, ROI and Turns for an item

ENTER A PAYOUT
Follow the steps below to process a payout on the RICS POS using funds within the cash drawer.
1. In the RICS POS, click the Payout tab
2. Use the Cashier dropdown menu to select the cashier processing the payout
3. Use the Purpose dropdown menu to select a payout reason as set in the RICS Back Office Setup :: Codes :: Manage Payout Types
4. Enter the dollar amount of the payout in the Amount field

5. Click Save
CLOCK IN/OUT ON THE RICS POS
Follow the steps below to enter a time clock record for an employee on the RICS POS.
CLOCK IN
1. In the RICS POS, click the Time Clock tab
2. Use the Cashier dropdown menu to select a cashier to be clocked in to the store

3. If necessary, enter a cashier password and click validate
Note: A user’s password should be entered as set in Setup :: Users :: Manage Users.

4. If necessary, select the Non-Sales Hours checkbox
Note: Non- Sales Hours should not be selected if the cashier’s hours will be counted towards selling hours.
5. Click Save
CLOCK OUT
1. In the RICS POS, click the Time Clock tab
2. Use the Cashier dropdown menu to select a cashier to be clocked out of the store

3. If necessary, enter a cashier password and click validate
Note: A user’s password should be entered as set in Setup :: Users :: Manage Users.

Note: If a cashier is currently clocked in, a “Clocked in at” time will display, along with the number of hours and minutes worked.
4. Click Save
CONVERT CURRENCY
Follow the steps below to convert different forms of current on the RICS POS if accepted within a store.
1. In the RICS Point of Sale, click the Convert Currency tab
2. Use the top Convert Currency dropdown menu to select the currency normally accepted within a store and enter the dollar amount to be collected
3. Use the bottom Convert Currency dropdown menu to select the currency to be accepted for a transaction
Note: The total necessary currency for the transaction will automatically display if Step 2 is completed.

Note: The currency exchange rate will automatically display in the Rate field after all steps have been completed.
SET RICS POS TERMINAL SETTINGS
Follow the steps below to set terminal specific settings on the RICS POS.
RECEIPTS
1. In the RICS POS, click the Options tab
2. Click the Receipt tab
3. Use the Receipt Printer dropdown menu to select a receipt printer installed on the computer
4. Use the Printer Columns dropdown menu to select the appropriate column size
Note: For a standard receipt printer, select 40 as the printer columns.
5. Use the Printer Type dropdown menu to select the appropriate printer type
6. If necessary, select the Print Logo checkbox if a logo will be printed on a receipt
Note: To add a logo to a receipt, the logo will need to be added via the receipt printer software.
7. If necessary, enter the number of lines needed in the Lines Per Page field based on the Printer Columns and Type selections
Note: For a standard receipt printer, enter 0 as the lines per page.

8. Click Save
TOOLS
1. In the RICS POS, click the Options tab
2. Click the Tools tab
Note: Prior to proceeding, please contact RICS Support at 800-654-3123 x1 for instructions to reset a terminal database. Resetting a terminal database will close a POS batch and will re-snap a POS terminal, making the POS unavailable for use until the process is complete.
PAYMENT CARD
1. In the RICS POS, click the Options tab
2. Click the Payment Card tab
Note: Prior to proceeding, please contact RICS Support at 800-654-3123 x1 for instructions on how to set up your integrated credit card processor. Adjusting payment card settings will modify the RICS POS and may prevent sales transactions from being completed.
POLE DISPLAY
1. In the RICS POS, click the Options tab
2. Click the Pole Display tab
3. Use the COM Port dropdown menu to select the port in which a pole display is installed on the computer
4. If necessary, use the Baud Rate dropdown menu to select the baud rate for the pole display.
Note: For all pole displays purchased through Shop-RICS, select 9600 as the Baud Rate.
5. Use the Display Type dropdown menu to select the brand of pole display installed on the computer

6. Click Save
DYMO PRINTER
1. In the RICS POS, click the Options tab
2. Click the Dymo Printer tab
3. Use the Dymo Label Printer dropdown menu to select a label printer installed on the computer
Note: The field should be set to None unless a label will be printed after all transactions processed on the RICS POS.

4. Click Save
GIFT CARD
1. In the RICS POS, click the Options tab
2. Click the Gift Card tab
Note: Prior to proceeding, please contact RICS Support at 800-654-3123 x1 for instructions to set up your integrated gift card processor. Adjusting gift card settings will modify the RICS POS and may prevent sales transactions from being completed.
ACCESS THE RICS BACK OFFICE
Follow the steps below to use limited RICS Back Office features from the RICS POS to view on hand inventory, manage a customer and reprint a ticket.
INVENTORY INQUIRY
GENERAL TAB
1. To select an item, enter or search for a SKU in the SKU field
Note: After the item is selected, the SKU Details will display providing general information about the item.

Note: General information displayed is determined by a user’s permission settings and roles.
2. Use the Primary and Secondary dropdown menus to determine what inventory value to display
Note: Depending on the Primary view selected, the Secondary view option may not be available.
3. If necessary, enter a store or state in the corresponding fields
Note: This option should only be used in a multi-store environment.
OPTIONAL DETAILS TAB
3. With the item loaded on the General Tab, click the Optional Details tab to see sale details and summary, transactional detail report, and purchase order details
Options:
Show Sales Summary – Select to display a summary of weekly, monthly, yearly, and seasonal sales including quantity sold, net sales, and profit for an item.

Show Detailed Report – Select to display all transactions processed through the RICS Back Office and the RICS POS for an item including date, column and row, type of transaction, cost, etc.

Show Purchase Order Detail – Select to display purchase order details for open or recently closed POs for an item.

Show Info Report – Select to display monthly sales quantity and dollars, GP%, ROI and Turns for an item

MANAGE CUSTOMER
CREATE A CUSTOMER
1. Enter up to a thirty-two character alphanumeric customer account number in the Account Number field
2. Select or enter a title, first name, middle initial, last name and/or gender in the corresponding fields
Note: The Full Name field will autofill with the information entered in Step 3, but can be modified as needed.
3. If necessary and available, select or enter an A/R post to account number and a frequent buyer program in the corresponding fields
Options:
A/R Post To – To enter an A/R post to account number, the store must have A/R set up within A/R :: A/R Setup and the customer must be established as an A/R customer within A/R :: Enter A/R Customers.
Frequent Buyer Program – To select a frequent buyer program, the store must have a frequent buyer program created within Setup :: Manage Frequent Buyer and enabled within the store.

4. Select or enter an address type, address, city/state, postal and/or country code in the corresponding fields
5. Enter an email and/or phone number in the corresponding fields
Options:
Email – Enter up to a sixty-four character alphanumeric email address.
Phone Number – Enter up to a twenty digit phone number.

6. If necessary, select or enter the following optional customer account options
Options:
Comment – Enter a comment to display when the customer is loaded in the RICS Back Office or at the RICS POS.
Credit Limit – Enter the dollar limit the customer has available for use at the RICS POS.
Charge Balance – Enter the current balance the customer owes the store.
Store Credit Balance – Enter the current balance the store owes the customer.
Frequent Buyer Qty – Enter the purchased quantity accumulated towards a frequent buyer reward plan.
Frequent Buyer Amt – Enter the purchased amount accumulated towards a frequent buyer reward plan.
Tax Exempt – Select to set an account as non-taxed for all transactions processed through the RICS POS.
Tax Exempt ID – Enter up to a thirty-two character alphanumeric tax ID.
Birth Date – Enter a customer’s birth date in MM/DD format.
Alert – Enter an alert message to automatically alert a cashier when the customer is loaded in the RICS Back Office or at the RICS POS.

7. If necessary, enter a custom entry, custom attribute, parent and/or child relationship in the corresponding fields
Options:
Custom Entries – Select or enter any customer custom entries.
Custom Attributes – Enter custom text to display when the customer is loaded in the RICS Back Office or at the RICS POS.
Parent/Child Relationships – Enter the account number of another customer with which to associate the created customer.
8. Click Save
EDIT A CUSTOMER
1. To select a customer, enter or search for the account number in the Account Number lookup field
Note: After the account number is selected, the Customer Details, Custom Entries, Custom Attributes and Relationship fields will populate
2. Edit the Customer Details, Custom Entries, Custom Attributes and/or Relationship fields
3. Click Save
REPRINT TICKET
1. To reprint a ticket, enter or search for a ticket number in the Ticket # field

Note: After the ticket is selected, a copy of the ticket will display.
2. Click Reprint Ticket
FIND INVENTORY BY SIZE
CRITERIA TAB
1. Select and enter the necessary criteria to determine in which size you want on hand information displayed. Multiple criteria options can be selected to narrow down a user’s search.
Options:
By Supplier – Enter or search for a supplier code(s) to select which supplier(s) to output.
By Class – From the dropdown menu, select the class or classes to select which class to output.
By Color – Enter a color(s) to select which color(s) to output.
By SKU – Enter or search for an item(s) to select which item(s) to output.
By Col – From the dropdown menu, select the column value(s) within the column grid(s) to output.
By Row – From the dropdown menu, select the row value(s) within the row grid(s) to output.
Product Custom Entries – If setup within your store, enter a custom entry or entries to determine which custom entry to output.

Note: If selecting multiple Suppliers, Colors, SKUs, or Product Custom Entries, separate the values by commas. If wanting to exclude the selected value(s), select the checkbox next to Exc.
2. After you have set the criteria, click Display Results to view the items matching the criteria
VIEWING RESULTS

Note: Use the Sort Results By dropdown menu to change the how results are displayed.
Comments