The RICS Universal Imports feature enables retailers to create, import, and update customer data in small or large quantities to save time and improve data accuracy.
This document is a resource for retailers to understand how to use the Universal Import feature to:
• Create a Customer Import
• Upload a Customer Import
• Edit a Customer Export
• Upload a Customer Update
CREATE CUSTOMER IMPORT
Follow the steps below to create a customer import.
1. In the RICS Back Office, go to System :: Import :: Universal Imports
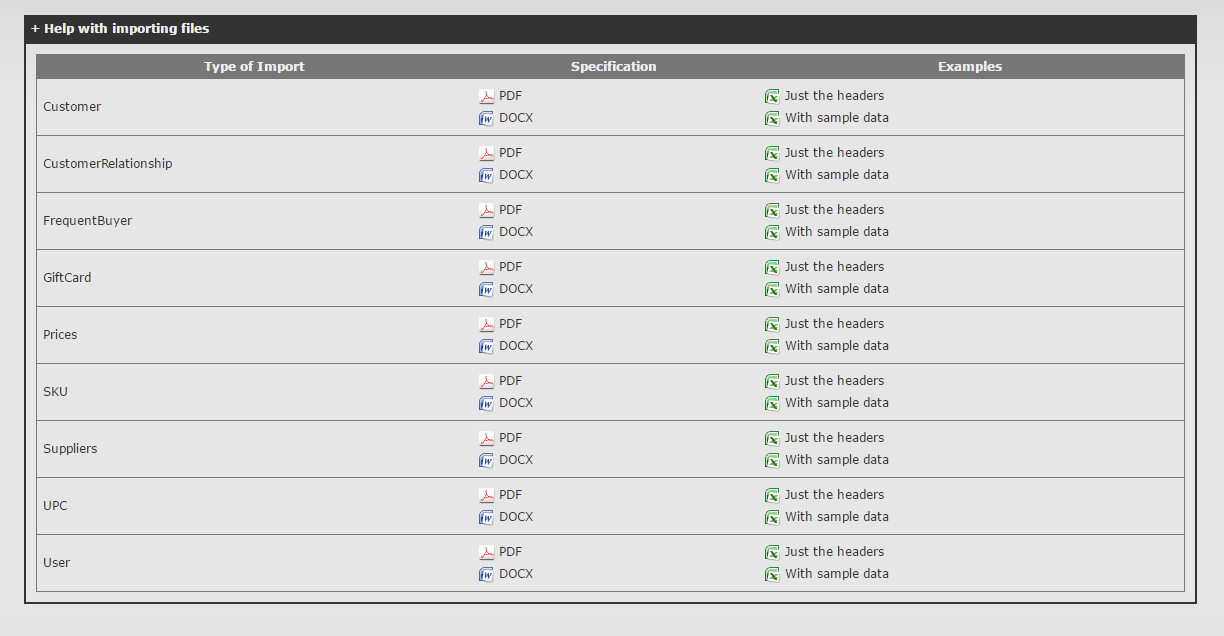
2. Click Help with importing files

3. Select the ‘Just the headers’ template file in the Customer section
Note: The customer import template will open in Excel.
4. Enter the appropriate values in the following required fields
Options:
Account Number – Enter up to a thirty-two character alphanumeric account number, typically a phone number.
First Name – Enter up to a twenty-five character alphanumeric first name.
Last Name – Enter up to a thirty character alphanumeric last name.
5. If the information is available, enter the appropriate values in the following optional fields
Options:
Salutation – Enter up to a sixteen character alphanumeric salutation.
Address Line – Enter up to a 128 character alphanumeric address.
City – Enter up to a sixty-four character alphanumeric city.
State – Enter a two character state or providence abbreviation.
Zip Code – Enter up to a sixteen character alphanumeric zip code.
Country – Enter a two character country abbreviation.
Phone Number – Enter up to a twenty digit phone number.
Email – Enter up to a sixty-four character alphanumeric email address.
Email Receipt – If an email address is present, enter ‘YES’ to email receipts or ‘NO’ to exclude.
Gender- Enter ‘M’ for male or ‘F’ for female.
Birthday – Enter a birthdate in MM/DD/YYYY format.
How Heard About – Enter up to a fifty character alphanumeric note about how the customer heard about the store.
Stop Prompt For FBP Enroll – If FB is enabled, enter ‘NO’ to prompt to enroll or ‘YES’ to stop the prompt.
Is Tax Exempt – Enter ‘YES’ to exclude tax on the customer’s purchases or ‘NO’ to include.
Tax Exempt Id – Enter up to a thirty-two character alphanumeric tax exempt ID.
Credit Limit – Enter the credit limit available to the customer.
Current Balance – Enter the current balance owed to the store by the customer.
Store Credit – Enter the store credit amount owed to the customer by the store.
Life Time Dollars – Enter the life time dollars spent.
Life Time Quantity – Enter the life time quantity (items) purchased.
Memo – Enter up to a 1024 character alphanumeric memo.
Custom Entry – If set up within Setup :: Manage Custom Entries, enter a custom entry or entries the customer is associated with in TagParent|Tag format (i.e., Running Club|Eagles).
6. Click File, then Save As to name and save the customer import in .csv format
UPLOAD A CUSTOMER IMPORT
Follow the steps below to upload a customer import.
1. In the RICS Back Office, go to System :: Imports :: Universal Imports
2. Click Choose Files

3. Select the customer import saved in Step 6 of the Create Customer Import section
4. Click Open
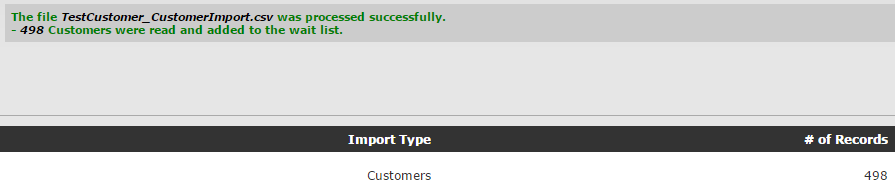
Note: After the customer import is opened, the file will appear in green with the number of records to be imported. If a message appears in red, please address any issues prior to completing Step 5. The Import Type and # of Records will also display the type of import and number of customers within the file.
5. In the Treat as section, select New Entries

6. Click Import Records

7. Review the Import Report from the Report History to verify the customer import was successful
EDIT A CUSTOMER EXPORT
Follow the steps below to edit a customer export.
1. In the RICS Back Office, go to Reporting :: Report Creator :: File Printouts :: Export Customers
2. Enter the necessary values on the Report Options and Report Criteria tabs to determine which customers to export
Note: To export all customers, leave the report options and report criteria fields blank.
3. Click Export Data
Note: The user will automatically be taken to Report History screen.
4. Select the Export Customers Report
Note: The customer export will open in Excel in the same format as a customer import file.
5. Edit any required or optional fields in the file with the exception of the Account Number field
Required Fields – See Create Customer Import Step 4 for field requirements.
Optional Fields – See Create Customer Import Step 5 for field requirements.
6. Click File, then Save As to name and save the customer import in .csv format
UPLOAD A CUSTOMER UPDATE
Follow the steps below to upload a customer update.
1. In the RICS Back Office, go to System :: Imports :: Universal Imports
2. Click Choose Files

3. Select the customer import saved in Step 6 of the Edit Customer Export section
4. Click Open
Note: After the customer import is opened, the file will appear in green with the number of records to be updated. If a message appears in red, please address any issues prior to completing Step 5. The Import Type and # of Records will also display the type of import and number of customers within the file.

5. In the Treat as section, select Updates

6. Click Import Records

7. Review the Import Report from the Report History to verify the customer update was successful
Comments