QuickBooks is a popular accounting software used by many specialty retailers. RICS integrates directly with QuickBooks to send daily general ledger information from closed POS batches.
Follow the step-by-step directions below to integrate RICS with QuickBooks Online.
Enablement
Prior to connecting your RICS account to QuickBooks, please contact RICS Support to have a support team member activate the integration for your organization then follow the steps below.
- Login to the Store Owner level of your RICS Backoffice
- Navigate to Setup :: Users :: Manage Roles
- Click on ‘LookUp’ in the Quick Lookup, without entering any data in the field
- Locate the Role Name you wish to give access to QuickBooks; click ‘Select’
- Scroll down the Permissions list to Setup : Store and click on the ‘QuickBooks Setup’ role
- Click ‘Save’
Connect to QuickBooks Online
Before a user can start exporting to QuickBooks, the account must be linked to RICS using the steps outlined below.
- Download the RICS QuickBooks Connector (http://downloads.ricssoftware.com/partners/quickbooks/QuickBooksSetup.exe)
- The file will appear at the bottom left corner of your screen if using Chrome, or the top right corner if using Edge
- Follow the prompts to install the RICS QuickBooks Connector
Note: RICS QuickBooks Connector is necessary to connect your RICS Backoffice to QuickBooks Online.
- Navigate to Setup :: Manage Store :: QuickBooks Setup
- Type the Store Owner number into the ‘Store Number’ Quick Lookup field; click LookUp.
- Select ‘Online’ from the QuickBooks Edition options
- Click ‘Connect to QuickBooks’
- Sign into QuickBooks using your existing User ID and Password
- Close the QuickBooks sign-in window
- Click ‘Load Accounts’ at the bottom of the page.
- Click ‘Accounts’
- Proceed to step 3 in Mapping Accounts below
MAPPING ACCOUNTS
A mapping tells the system which QuickBooks account to use for a certain piece of data. For example, the store owner might want the Cash tender to map to a particular checking account in QuickBooks.
RICS recommends setting up your QuickBooks mappings at the Store Owner level. When a mapping is defined at the Store Owner level, it will be inherited by each Store beneath it. Mappings can be updated at the store level as well, if needed.
- Type the Store Owner number into the ‘Store Number’ Quick Lookup field; click LookUp.
- Click ‘Accounts’
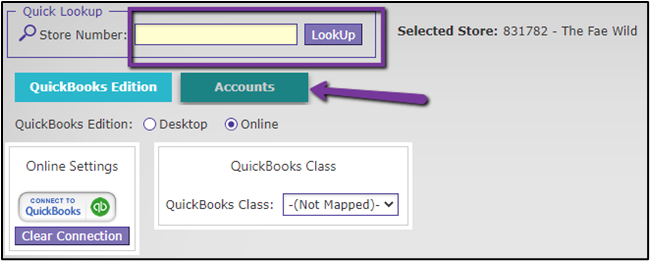
- Map all Tenders and Transaction Types to their appropriate QuickBooks accounts by checking the box next to each and selecting the appropriate account from the dropdown on the right

- Click ‘Save’
- Repeat this process for each store by entering the Store Level number in the ‘Store Number’ Quick Lookup field.
- Click 'Save' after setting the mappings for each store location.
FINANCIAL EXPORT
After mapping your accounts you may begin exporting to QuickBooks. Daily exports are available beginning from the day RICS Support enables your integration; any sales prior to this date are not available for export.
- Login to the RICS Backoffice
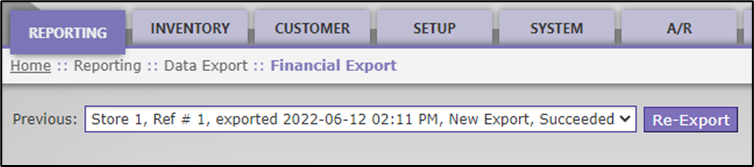
- Navigate to Reporting :: Financial Export
- Click ‘New Export’
Note: An alert center message will appear informing you of how many records were exported to QuickBooks and for which locations
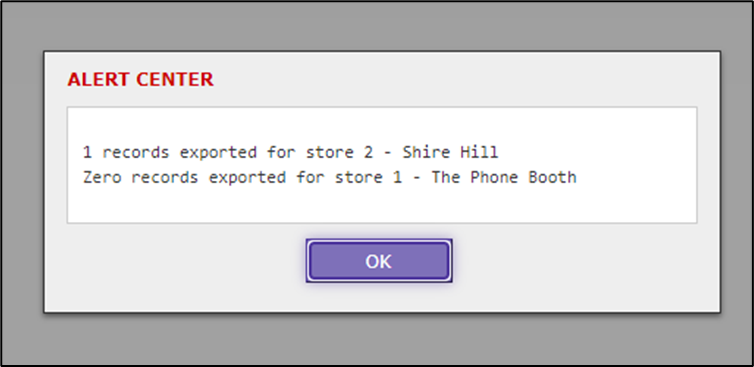
- After clicking ‘OK’, an entry will appear in the drop-down at the top of the page with the date and time of the export
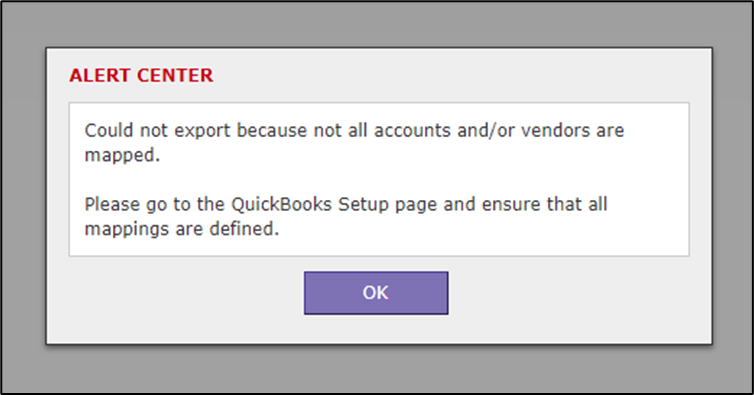
Note: An alert will come up if any of the tenders or transactions used on that day’s batch are not mapped in QuickBooks Setup. If you receive the alert shown below, please follow the Mapping Accounts steps outlined above.
Comments